Tuesday, 31 March 2015

OAF: Sample code to call PL/SQL Procedure from OA Framework

Please find below sample code to call PL/SQL procedure from OA Framework page.

In the below example first 4 parameters are IN parameters and the last 3 parameters are OUT parameters.This example code is a function defined in the ApplicationModule.

 import oracle.jdbc.OracleCallableStatement;   
 import oracle.jdbc.OracleTypes;
 import oracle.jbo.domain.Number;
 import oracle.jbo.domain.Date;
    
 public void callPLSQLProc(Number id,String code,Date currentDate)   
 {   
      OracleCallableStatement callableStatement = null;   
      try   
      {   
           String callProc = " BEGIN xxaj_pkg.xxaj_proc "+   
                                         "(p_id             => :1," +   
                                         " p_code           => :2," +
                                         " p_date           => :3," +
                                         " p_commit         => :4," +                                                  
                                         " x_return_status  => :5," +   
                                         " x_msg_data       => :6," +   
                                         " x_msg_count      => :7);"+   
                                    " END; ";   
           callableStatement = (OracleCallableStatement)getOADBTransaction().createCallableStatement(callProc,1);   
           callableStatement.setNUMBER(1, id);   
           callableStatement.setString(2, code);           
           callableStatement.setDATE(3, currentDate);     
           callableStatement.setString(4, "Y");      
           callableStatement.registerOutParameter(5,OracleTypes.VARCHAR,255);   
           callableStatement.registerOutParameter(6,OracleTypes.VARCHAR,255);   
           callableStatement.registerOutParameter(7,OracleTypes.NUMBER,255);     
           callableStatement.execute();   
           String resultMessage = (String)callableStatement.getString(5);   
           String msgData  = (String)callableStatement.getString(6);   
      }   
      catch(Exception e)   
      {   
           e.printStackTrace();   
           throw new OAException(e.toString(),OAException.ERROR);   
      }   
      finally   
      {   
           try   
           {   
                callableStatement.close();   
           }   
           catch(Exception exception2)   
           {   
                throw OAException.wrapperException(exception2);   
           }   
      }   
 }         

Package Spec is as below:
 create or replace package xxaj_pkg as  
 procedure xxaj_proc (p_id            in number  
                     ,p_code          in varchar2  
                     ,p_date          in date  
                     ,p_commit        in varchar2  
                     ,x_return_status out varchar2  
                     ,x_msg_data      out varchar2  
                     ,x_msg_count     out number);  
 end xxaj_pkg;  


Feel free to point out if anything is missing/wrong in this blog.

Saturday, 28 March 2015

OAF: Create Switcher Bean in a table dynamically/programmatically

In some cases we need to create a Switcher Bean in existing OAF Pages. We can add this switcher bean programmatically using an extended controller. Sample code is given below:


 private void addDeleteSwitcher(OATableBean tableBean, OAPageContext pageContext)  
  {  
   OASwitcherBean deleteSwitcher = (OASwitcherBean)tableBean.findChildRecursive("DELETE_SWITCHER");  
   if (deleteSwitcher == null)  
   {  
    /*  
     * Create Delete Bean Enabled  
     */  
    OAImageBean deleteBean = (OAImageBean)createWebBean(pageContext, OAWebBeanConstants.IMAGE_BEAN, null,"DELETEROW");  
    Hashtable paramsWithBinds = new Hashtable(1);  
    paramsWithBinds.put("xxPlanIdParam", new OADataBoundValueFireActionURL(deleteBean, "{$PLAN_ID}"));  
    deleteBean.setFireActionForSubmit("DeleteRow",null,paramsWithBinds,true,true);  
    deleteBean.setSource(OAWebBeanConstants.APPS_MEDIA_DIRECTORY + "deleteicon_enabled.gif");  
    deleteBean.setShortDesc("Delete this row from the Quality Plan Results");  
    deleteBean.setLabel("Delete");  
    deleteBean.setHAlign(OAWebBeanConstants.H_ALIGN_CENTER);  
    /*  
     * Create Delete Bean Disabled  
     */  
    OAImageBean deleteBeanDisabled = (OAImageBean)createWebBean(pageContext, OAWebBeanConstants.IMAGE_BEAN, null,"DELETEROWDISABLED");  
    deleteBeanDisabled.setSource(OAWebBeanConstants.APPS_MEDIA_DIRECTORY + "deleteicon_disabled.gif");  
    deleteBeanDisabled.setShortDesc("Plan Result has been transferred to EAM and cannot be deleted");  
    deleteBeanDisabled.setLabel("Delete");  
    deleteBeanDisabled.setHAlign(OAWebBeanConstants.H_ALIGN_CENTER);  
    /*  
     * Create Switch Bean  
     */  
    deleteSwitcher = (OASwitcherBean)createWebBean(pageContext, OAWebBeanConstants.SWITCHER_BEAN,null,"DELETE_SWITCHER");  
    deleteSwitcher.setNamedChild("N",deleteBean);  
    deleteSwitcher.setLabel("Delete");  
    deleteSwitcher.setNamedChild("Y",deleteBeanDisabled);  
    deleteSwitcher.setViewUsageName("ViewResultsVO");  
    deleteSwitcher.setViewAttributeName("DeleteSwitcherAttribute");   
    deleteSwitcher.setRendered(true);  
    tableBean.addIndexedChild(deleteSwitcher);  
   }  
  }  

Feel free to point out if anything is missing/wrong in this blog.

OAF: Sample Code to create Dynamic VO in OA Framework

In some cases, we need to create Dynamic View Object in OA Framework. The sample code to create a dynamic View Object is given below.

 ViewObject dynamicViewObject = appModule.findViewObject("XXDynamicVO");  
 if(dynamicViewObject == null)  
 {  
  String voQuery = " SELECT USER_NAME " +  
                                " FROM fnd_users FU " +  
                                " WHERE FU.user_id = :1 ";  
  customViewObject = appModule.createViewObjectFromQueryStmt("XXDynamicVO",voQuery);  
 }  
 if(customViewObject != null)  
 {  
  customViewObject.setWhereClause(null);  
  customViewObject.setWhereClauseParams(null);  
  customViewObject.setWhereClauseParam(0,userID);  
  customViewObject.executeQuery();  
  Row customViewObjectRow = customViewObject.first();  
  if(customViewObjectRow != null)  
  {  
       String userName = (String)customViewObjectRow.getAttribute(0);  
       writeLog(pageContext,"UserName:" + userName);  
  }  
 }  

Feel free to point out if anything is missing/wrong in this blog.

OAF: OA Dialog Page not working when FND Diagnostics Profile is not set

Many users have raised this question in OTN forum recently."When clicking on 'Ok' or 'No' button in OA Dialog Page, the page errors out if the FND Diagnostics profile is not set".

I have found 2 reasons for this and thought of putting this in a blog, so that it will help others.
  • If setPostToCallingPage(true) is set, then the processRequest() of the calling page will get called when the 'Ok' or 'No' button is pressed. so you should place the processRequest() inside a if condition as mentioned below, to avoid unexpected errors. This will avoid executing the code in processRequest when the OADialog page buttons are called. [Assuming "Yes" and "No" are the ButtonItemNames set using the below code. dialogPage.setOkButtonItemName("Yes"); dialogPage.setNoButtonItemName("No"); ]
 public void processRequest(OAPageContext pageContext, OAWebBean webBean) {  
      if ((pageContext.getParameter("Yes") == null) && pageContext.getParameter("No") == null) {     
           super.processRequest();    
           // Any additional custom code    
      }    
 }  

  • If the FND Diagnostics is not set, then                 pageContext.getParameter(OAWebBeanConstants.EVENT_PARAM) is returning null. So in the code, you should always do a null check before you use the variable which gets the value from the above.

Wrong usage :
 String eventParam = pageContext.getParameter(OAWebBeanConstants.EVENT_PARAM);  
 if (eventParam.equals("delete"))  
 {  
    // write the code here  
 }  
Correct usage:
 String eventParam = pageContext.getParameter(OAWebBeanConstants.EVENT_PARAM);  
 if ("delete".equals(eventParam))  
 {  
     // write the code here  
 }  

Feel free to point out if anything is missing/wrong in this blog.

Friday, 27 March 2015

Oracle Apps: How to delete a concurrent program in Oracle eBusiness

You cannot delete a concurrent program from the front-end. You can only disable it.


If you want to delete the concurrent program and the executable (if needed) programatically using the below code.

 begin  
 fnd_program.delete_program('CONC_PROG_SHORT_NAME'  
                         ,'APPLICATION_SHORT_NAME');  
 fnd_program.delete_executable('EXECUTABLE_SHORT_NAME'  
                           ,'APPLICATION_SHORT_NAME');  
 COMMIT;  
 end;   

Feel free to point out if anything is missing/wrong in this blog.

OAF: How to list all the Parameter names and values in OA Page

How to list all the Parameter  Names and Values passed to a page in Oracle Applications Framework (OAF).

Write the below code in the page Controller .


 import java.util.Enumeration;  
 Enumeration enums = pageContext.getParameterNames();  
 while(enums.hasMoreElements()){  
   String paramName = enums.nextElement().toString();  
   System.out.println("Param name:-->" +paramName+ ";Value:-->"+pageContext.getParameter(paramName));  
 }  

Feel free to point out if anything is missing/wrong in this blog.

Monday, 23 March 2015

ADF: Dynamic Menu based on roles in ADF Web Application

This post explains how to create dynamic menus based on the roles/user types  in the ADF Web Application. 


When I wanted to create a dynamic menu for my application, I googled and found lots of videos/blogs on dynamic menus. In most of them, the dynamic behaviour was for the second level menu. Here I will explain how to achieve this for the first level menu itself.
  1. Create the View Activities in the Task Flow
  2. Generate the menu model
  3. Bind the item nodes in the menu model with an EL
  4. Use Navigation Pane to display the menu in the page
You can refer this video for creating a menu model in ADF Web Application.
  • Create the view activities in the adfc-config.xml. Right click and select 'Create and Update ADF Menu'.


  • Now the menu model is created. Now we can set the properties of each item Node. 
Here we set the rendered property of each item Node. These settings will reflect in the pages in the runtime. We can set the rendered property in various ways. Below mentioned are the 3 options which I am aware of.
   Option 1 : Based on Specific Role. 
      ex:- #{securityContext.userInRole['MANAGER-ROLE']}
   Option 2: Based on current SecurityContext, whether the user has access to the corresponding page Definition.
      ex:- #{securityContext.regionViewable['view.pageDefs.managersPageDef']}
   Option 3: Based on custom managedBean property. You can define a boolean variable in your Managed Bean                     (session scope) and use that as an EL. You need to set this variable after the login Activity.
      ex:- #{loginBean.dispManagerMenu}
Note:- ADF Security has to be configured for option1 and option2. The below screen shots are based in the option1.
  • Create a ADF page template and add a Navigation Pane.
       Note:- Make sure that you set the rendered property for the navigation item. This is the property which                   dynamically show/hide the menu during runtime.
  • Create the pages using this template.
  • ADF Security is configured as below.

                    Manager User --> Manager Enterprise Role --> Manager Role

                    Department User --> Department Enterprise Role --> Department Role


                     Manager Role has access to Employees and Managers.
                     Department Role has access to Employees and Departments.


  • Now lets run the page. 
           Login as MANAGER/Welcome1

           Login as DEPARTMENT/Welcome1


Sample application built using Jdev 12.1.3 can be downloaded from here.


Ref: http://www.oracle.com/technetwork/developer-tools/adf/learnmore/48-sitemenu-protection-169190.pdf

Feel free to point out if anything is missing/wrong in this blog

Tuesday, 17 March 2015

ADF: Show image files from database as a popup in ADF Web Application

This post explains how to show the image files (.jpg/.png/.pdf etc..),  stored in the database in a blob column, as a popup in the ADF Web Application. 


To show the file from server (file system), you can see Ashish's blog 
Show uploaded file (pdf/text/html/xml/image) content on page -Oracle ADF

In this post, I will show you how to invoke the popup from a table component and show the image corresponding to the row in the popup.

1. Add the Link component as a cloumn in the table.
2. Add a popup component and add a inlineFrame inside the popup.
3. Set the source of the inlineFrame as Servlet.

Script to create the table and steps to configure the DataSource in Weblogic can be downloaded from here.
  • Create a servlet as below.


The code is available in the application attached at the end of this post. Two things which you need to take care if while writing the Servlet. 
  1. Give the correct JNDI name as defined in the Weblogic Server. You coud also use DriverManager class if you don't want to create the DataSource. Sample code for DeviceDriver class is attached below.   
  2. Make sure that you give the correct content type for the response. In the above Servlet, I am using the content type from the value which is stored already in the database. If not available, I am using custom ContentTypes class to derive the content type based on the file name. 
  • Configure the Servlet in the web.xml. Open the web.xml and add the newly created servlet (ImageServlet). Then add the Servlet mapping (/imageServlet)for this servlet.

  • Follow the below steps to add the popup feature.
  1. Add the Link component as a column in the table. [This is on the assumption that you already have a af:table in your page which displays the data from the table]. Set the Icon property to show a image in that column. Remove the text property.
  2. Add a popup component to the same column and set the id property to 'popupImage'
  3. Add a panelWindow  to the popup component.
  4. Add a inlineFrame to the panelWindow and set the source to the Servlet. Source = '/imageServlet?imageID=#{row.ImageId}'. imageID is the parameter being used in the servlet.  #{row.ImageId} gets the Id value from the VO Row.
  5. Add showPopupbehaviour to the Link component and set the PopupId same as the id property of the Popup component 'popupImage'.


  • Now we can run the page.


Sample application can be downloaded from here.

Feel free to point out if anything is missing/wrong in this blog

Tuesday, 10 March 2015

ADF: Send Email from ADF Web Application

This post will describe how to send email from ADF Web application.

2 ways (which I know) to achieve this:
  1. Use the Apache Commons Email. [This can be used while deploying in GlassFish server. I haven't tried myself yet in Glassfish].
  2. Use the Javax Mail API's along with the MailSessions configuration in Weblogic Server.
Use Apache Commons Email.
 import org.apache.commons.mail.DefaultAuthenticator;  
 import org.apache.commons.mail.Email;  
 import org.apache.commons.mail.EmailException;  
 import org.apache.commons.mail.SimpleEmail;  
 public static void sendEmail() throws EmailException  
 {  
      Email email = new SimpleEmail();  
      email.setHostName("smtp.gmail.com");  
      email.setSmtpPort(587);  
      email.setAuthenticator(new DefaultAuthenticator("XXXXX", "XXXXX"));  
      email.setSSLOnConnect(true);  
      email.setFrom("xxxx@xxxx.com");  
      email.setSubject("Subject of the Email!!");  
      email.setMsg("First Line in the Message Body.\nSecond Line.");  
      email.addTo("yyyy@yyyy.com");  
      email.send();  
      System.out.println("Email Sent successfully to yyyy@yyyy.com");  
 }  
Use JavaX Mail APIs.
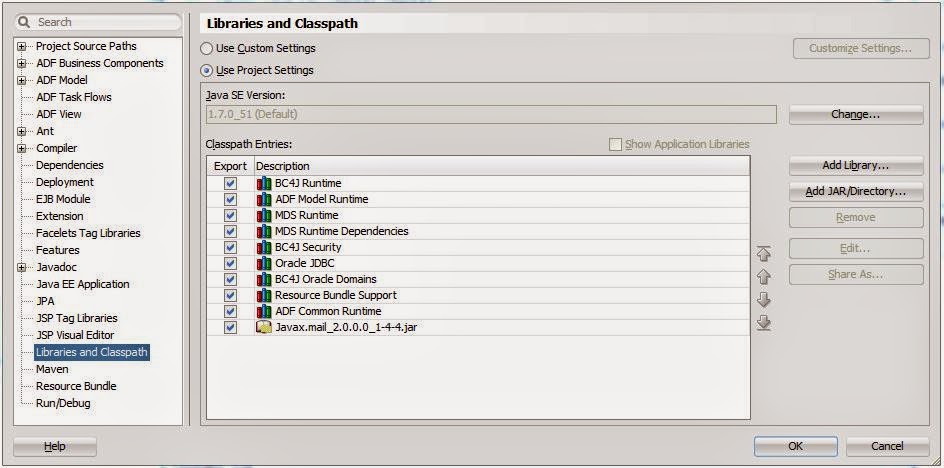
  • Javax mail API's are available as part of the Jdev install (Jdev 12.1.3). This file is available under             %MIDDLEWARE_HOME%\Oracle_Home\oracle_common\modules\javax.mail_2.0.0.0_1-4-4.jar
  • Add this jar file to the Project Library.
  • You can configure the mailserver details in the Weblogic server. The Weblogic server configuration and the code to send email is detailed in the Lalit Kapoor's Sending E-Mail From an ADF Application Deployed on WebLogic Server
  • I have a created a word document with the configuration steps and the code, which you can download from here.
Feel free to point out if anything is missing/wrong in this blog.

Saturday, 7 March 2015

ADF: Retrive logged in user's userID in the Managed Bean in a ADF Web Application

This post will describe how to derive userId from the database when we use SQLAuthenticator/ReadOnlySQLAuthenticator for authentication in a Fusion Web Application. 

Some example scenarios which you need to use this are:
  1. Your application tables has a userId column (created_by/last_updated_by) which you want to populate with the userId of the loggedIn Person.
  2. You want to display the Person Name, instead of the username in the main page
  • Create a Query based ViewObject to retrieve the userID.

  • Add a viewCriteria for the newly created ViewObject.
  • Add this ViewObject to the AM.
  • Write a method in the AM to accept the userName and return the userID by executing the ViewCriteria.
  • Expose this AM method in the Client Interface.

  • Now add this service as a methodAction binding to your Login PageDefinition. Map the parameter value to the userName in the LoginBean. #{loginBean.userName}


  • Now you can access this method inside your doLogin() method in your LoginBean and get the userID (or any other user related Information).
  • Now lets run this.
  • You can see the userId is getting printed from the LoginBean


You can store this in session/userData and use that for populating the userID columns (created_by/last_updated_by) in the Entity Objects. You can modify this code and get the DisplayName instead of userID, if you want to display it in the logged in screens.


Script to create tables and step by step information to configure ReadOnlySQLAuthenticator is available here. This is created based on Edwin's blog Using database tables as authentication provider in WebLogic.

Sample application built using Jdev 12.1.3 can be downloaded from here

To run the attached application, you might need to do 2 things:


  1. Configure the SQLAuthenticator/ReadOnlyAuthenticator based on the Edwin's blog or the attached doc below.
  2. Modify the UsersVO query based on your table. [I have used the same tables as mentioned in Edwin's blog with ReadOnlySQLAuthenticator].

To store any Global User Information across multiple AM, you can refer to Andrejus blog  Solution for Sharing Global User Data in ADF BC.

Feel free to point out if anything is missing/wrong in this blog.

Wednesday, 4 March 2015

My First Blog!!!!

ഇപ്പോൾ പണിപ്പുരയിൽ ആണ് . ഉടനെ തന്നെ പുറത്തു വരും. ആകാംഷയോടെ കാത്തിരിക്കുക!!!!!!!!!!